Posts

Hide Columns in NewForm.aspx / EditForm.aspx / DispForm.aspx

Hide SharePoint Columns in New / Edit / View Form Open the SharePoint Designer 2010, Go to the Corresponding List/ Library. Open the New/Edit / View Item Aspx Page in Edit In Advance Mode add the Following script <asp:Content ContentPlaceHolderId="PlaceHolderAdditionalPageHead" runat="server"> Now copy & paste this JavaScript code after above mentioned tag : <script language= "javascript" type= "text/javascript" > _spBodyOnLoadFunctionNames.push( "hideFields" ); function findacontrol(FieldName) { var arr = document.getElementsByTagName( "!" ); // get all comments for ( var i=0;i < arr.length; i++ ) { // now match the field name if (arr[i].innerHTML.indexOf(FieldName) > 0) { return arr[i]; } } } function hideFields() { var control = findacontrol( "Title" ); control.parentNode.parentNode.style.display= "none" ; c

Favicon icon in SharePoint 2010

Image
Copy the download image to your layouts folder C:\Program Files\Common Files\Microsoft Shared\Web Server Extensions\14\TEMPLATE\IMAGES\CompanyName Find the below in your master page and replace the new icon url. <SharePoint:SPShortcutIcon runat="server" IconUrl="/_layouts/images/CompanyName/favicon.ico"/>

Create an ASMX Web Service in SharePoint 2010 Using Visual Studio 2010

Image
Back in SharePoint 2007, asmx web services were quite prevalent, thanks to the WSPBuilder tool, and it’s templates.   They are useful for executing actions between multiple web applications and can be used by client applications, as well.  Furthermore, InfoPath forms, deployed to SharePoint, could also use these asmx web services. Unfortunately, Visual Studio 2010 did not come with a template for SharePoint web services.  So, today I will be writing about how we can create asmx web services for SharePoint 2010.  All you will need is SharePoint 2010. First, start a new Empty SharePoint 2010 project.  I will call this SPASMXService . Make sure to deploy it as a farm solution. First, you need to close this project by right clicking on the project and then selecting ‘unload project’. Then, right click on the project again, and select, ‘Edit SPASMXService’. Under < SandboxedSolution > False </ SandboxedSolution > type in: < TokenReplacementFileExtensions > asmx </

Create Groups In Drop Down List Box

Image
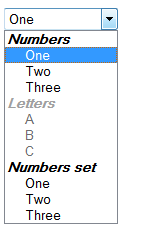
<html> <body> <select> <optgroup label="Numbers"> <option value="1">One</option> <option value="2">Two</option> <option value="3">Three</option> </optgroup> <optgroup label="Letters" disabled="true"> <option value="4">A</option> <option value="5">B</option> <option value="6">C</option> </optgroup> <optgroup label="Numbers set"> <option value="1">One</option> <option value="2">Two</option> <option value="3">Three</option> </optgroup> </select> </body> </html>       Grouping items in a drop-down list box is easy with the  optgroup   element. The optgroup  element is a child to the  select  element and has two attributes: label  (required) and  disabled  (optional). The required

ASP.NET 4.0 ClientID Overview

Introduction One of the new features being added to version 4.0 of ASP.NET is the ability to control the client side IDs that are generated by the framework.  Previously the framework would modify the client side IDs to uniquely identify each control.  This some times left you with the ID you defined in markup or sometimes left you with something that looks like this, “ctl00_MasterPageBody_ctl01_Textbox1.” The Problem The modification of the client side id property works great to ensure that each element is uniquely identified, however, to anyone that has tried to do any sort of client side scripting this becomes very frustrating. Chances are that if you have worked in ASP.NET for any time at all you have run into this issue.  The problem is that until runtime you do not what the client side ID could be, making it difficult to do any kind of client side scripting.  In addition any modification of the page, adding removing controls, can result in a different client sid